You might want to have a look at: Serial.bi, which I've written to simplify
the feared "first step", as much as possible ... (in serial communication).
FreeBasic communication with Arduino logic error?
-
BasicCoder2
- Posts: 3906
- Joined: Jan 01, 2009 7:03
- Location: Australia
Re: Arduino Serial Communication Demo #1
I ran your code on windows and got the same output as you did.coderJeff wrote:I'll have to test on Linux next, but TERMINAL_EOL probably only needs to be CHR(10) on Linux.
On the Raspberry Pi it all compiled as expected but failed to run with,
Permission denied.
Forgot how to fix that.
Of course I had to change the COM to ,
const DEVICE_COM = "/dev/ttyACM0"
Re: FreeBasic communication with Arduino logic error?
You must run it as "root" ... as explained by Joshy (D.J.Peters).BasicCoder2 wrote:Permission denied. Forgot how to fix that.
This applies to all UNIX based systems: LINUX / MAC / BSD e.t.c.
(excluded are only: WIN and DOS)
Re: FreeBasic communication with Arduino logic error?
It's not necessary to be root to access serial ports. Nearly all modern Linux distros have a group called, somewhat anachronistically, "dialout" and all serial devices are by default set to be group read and write-able to that group ip. So you just need to add your user id to that group and after a log out and log back in, you will have access to the serial devices. To add yourself to the group, distros often come with a graphical utility to do this. check your menu for something about "users and groups" or "user manager." Failing that, become root and edit /etc/group and add your user name to the dialout group. Might logging out and back in to become active.
-
BasicCoder2
- Posts: 3906
- Joined: Jan 01, 2009 7:03
- Location: Australia
Re: FreeBasic communication with Arduino logic error?
Sure but like I wrote I forgot how to do it. I did remember Joshy writing something about it and eventually found it.MrSwiss wrote:You must run it as "root" ... as explained by Joshy (D.J.Peters).
So I typed into a console window pi as the user and raspberry as the password.
pi@raspberrypi:~ $ su pi
Password:
pi@raspberrypi:~ $
When I compiled and execute the FreeBasic program again from Geany I got the blue console with its yellow block cursor.
When I hit a key the same thing came up, Permission denied.
The su pi and password did however work with the LED and button switch program using the gpio pins.
I have not changed the default username or password.
-
D.J.Peters
- Posts: 8586
- Joined: May 28, 2005 3:28
- Contact:
Re: FreeBasic communication with Arduino logic error?
fbc using_gpio.bas
sudo ./using_gpio
that's all
may be learning a little bit linux isn't a bad idea !
Joshy
sudo ./using_gpio
that's all
may be learning a little bit linux isn't a bad idea !
Joshy
-
BasicCoder2
- Posts: 3906
- Joined: Jan 01, 2009 7:03
- Location: Australia
Re: FreeBasic communication with Arduino logic error?
All I get when I type in the above is "command not found".D.J.Peters wrote:fbc using_gpio.bas
sudo ./using_gpio
that's all
I can't even find the using_gpio.bas file !!
Yes sure I will have to put more time aside for that. I had hoped it would be a little easier to figure out.may be learning a little bit linux isn't a bad idea !
I did have a similar problem with Windows10 when trying to run fb .exe files but that has gone away now. I have forgotten how or what I did!! I seem to remember you guys holding my hand through that one as well.
Re: FreeBasic communication with Arduino logic error?
Then that file does not exist or you are at the wrong location. Try:BasicCoder2 wrote:All I get when I type in the above is "command not found".D.J.Peters wrote:fbc using_gpio.bas
sudo ./using_gpio
that's all
I can't even find the using_gpio.bas file !!
pwd to show current working directory
ls to show files at current working directory
locate using_gpio.bas to locate it. (In case you don't know where you saved to file)
And be aware that the linux file systems are case sensitive.
-
D.J.Peters
- Posts: 8586
- Joined: May 28, 2005 3:28
- Contact:
Re: FreeBasic communication with Arduino logic error?
@BasicCoder2 are you kidding me :lol:
file: "using_gpio.bas" is an example for "your_program.bas" that use gpio file access !
fbc your_program.bas
sudo ./your_program
Joshy
file: "using_gpio.bas" is an example for "your_program.bas" that use gpio file access !
fbc your_program.bas
sudo ./your_program
Joshy
-
BasicCoder2
- Posts: 3906
- Joined: Jan 01, 2009 7:03
- Location: Australia
Re: FreeBasic communication with Arduino logic error?
Sadly I wasn't kidding. When you advised else where that I needed root rights and gave the example.
su root
That didn't work either until I realised you meant to use your name in place of the word root.
su pi
I do need to learn a bit more about Linux and its console commands.
Anyway your effort and the effort of others has encouraged me to keep at it for the time being.
su root
That didn't work either until I realised you meant to use your name in place of the word root.
su pi
I do need to learn a bit more about Linux and its console commands.
Anyway your effort and the effort of others has encouraged me to keep at it for the time being.
Last edited by BasicCoder2 on Aug 06, 2019 22:17, edited 2 times in total.
Arduino Serial Communication Demo #2
Arduino Serial Communication Demo #2
In the first demo, we were just moving single bytes at a time. And if all our messages were going to be single byte commands and single byte responses, we could stop there. But I can imagine we will eventually want to have a little more sophisticated messages.
In this next demo we are going to add some buffering on both the fbc (host) side and the arduino (device) side. It's also worth noting that we actually have 2 devices on the fbc side, the keyboard which we use to enter commands, and the terminal (display) which we use to see what we are typing and the responses from the arduino.
So, we are going to add 3 buffers:
- keyboard buffer (fbc)
- output command buffer (fbc)
- device input command buffer (arduino)
And we are going to use a really simple message structure for now:
<MESSAGE-TEXT><LF>
- a maximum length of 40 chars (which is reasonable considering the arduino COM buffer is only 64 bytes.
- LF, aka chr(10), terminating character, which is not part of the message.
First the Arduino Sketch (which can also be used with the demo #1 fbc host):
This sketch will recognize the "hello" command and will report back a message. Otherwise we just echo back what we got.
Now the fbc host program
And here is the results:
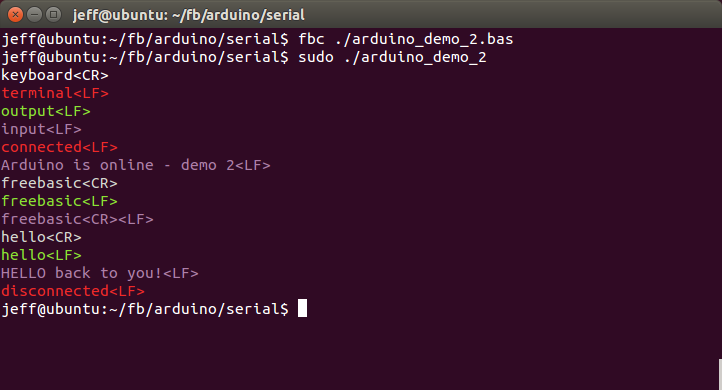
Also, the sketch from demo 1 & 2 can be used with either fbc program in demo 1 & 2. It's actually interesting to see what's going on if there is buffering at one end but not the other.
FYI, I added a conditional for /dev/ttyACM0 to be selected as COM port on linux. Otherwise it's "COM7" for win, which works for me.
I just noticed now when looking at the image I posted, that the sketch uses a Serial.println() which sends a CR+LF, and for consistency, should probably make that LF only
In the first demo, we were just moving single bytes at a time. And if all our messages were going to be single byte commands and single byte responses, we could stop there. But I can imagine we will eventually want to have a little more sophisticated messages.
In this next demo we are going to add some buffering on both the fbc (host) side and the arduino (device) side. It's also worth noting that we actually have 2 devices on the fbc side, the keyboard which we use to enter commands, and the terminal (display) which we use to see what we are typing and the responses from the arduino.
So, we are going to add 3 buffers:
- keyboard buffer (fbc)
- output command buffer (fbc)
- device input command buffer (arduino)
And we are going to use a really simple message structure for now:
<MESSAGE-TEXT><LF>
- a maximum length of 40 chars (which is reasonable considering the arduino COM buffer is only 64 bytes.
- LF, aka chr(10), terminating character, which is not part of the message.
First the Arduino Sketch (which can also be used with the demo #1 fbc host):
This sketch will recognize the "hello" command and will report back a message. Otherwise we just echo back what we got.
Code: Select all
#define END_OF_MESSAGE_CHAR 10
#define MAX_MESSAGE_LENGTH 40

void setup()
{
  Serial.begin( 9600 );
  while( !Serial )
    delay(1);

  Serial.print( "Arduino is online - demo 2\n" );
}

static uint8_t msg_buffer[MAX_MESSAGE_LENGTH+1] = { '\0' };
static uint8_t msg_length = 0;
static int16_t msg_last_char = -1;

void msg_clear()
{
  msg_buffer[0] = '\0';
  msg_length = 0;
  msg_last_char = -1;
}

uint8_t msg_addChar( int16_t ch )
{
  // nothing more to read?
  // we don't have full command yet so exit
  if( ch == -1 )
    return false;

  msg_last_char = ch;

  // end of line? we have a full command now
  if( ch == END_OF_MESSAGE_CHAR )
    return true;

  // anything else? just append to command buffer
  // but don't overflow the buffer
  if( msg_length < MAX_MESSAGE_LENGTH )
  {
    msg_buffer[msg_length] = ch;
    msg_length += 1;
    msg_buffer[msg_length] = '\0';
  }
  return false;
}

boolean msg_isComplete()
{
  return (msg_last_char == END_OF_MESSAGE_CHAR);
}

void loop()
{
  while( Serial.available() > 0 )
  {
    int16_t ch = Serial.read();
    if( msg_addChar( ch ) )
      break;
  }

  if( msg_isComplete() )
  {
    if( strcmp( "hello", msg_buffer ) == 0 )
    {
      Serial.print( "HELLO back to you!\n" );
    }
    else
    {
      // otherwise echo the command back to host
      Serial.write( msg_buffer, msg_length );
      Serial.println();
    }

    // we are done with the command no, so clear it.
    msg_clear();
  }
}
Code: Select all
#ifdef __FB_LINUX__
const DEVICE_COM = "/dev/ttyACM0"
#else
const DEVICE_COM = "COM7"
#endif

const DEVICE_FILE_NO = 1

const KEYBOARD_ESCAPE = chr(27)
const KEYBOARD_EOL = chr(13)
const KEYBOARD_BACKSPACE = chr(8)

#if defined(__FB_DOS__) or defined(__FB_WIN32__)
	const TERMINAL_EOL = chr(13, 10)
#else
	const TERMINAL_EOL = chr(10)
#endif

const DEVICE_EOL = chr(10)

const COLOR_KEYBOARD = 7
const COLOR_TERMINAL = 12
const COLOR_OUTPUT   = 10
const COLOR_INPUT    = 13

const MAX_BUFFER = 40

dim shared code(0 to 31) as zstring * 4 = _
	 { _
		"NUL", "SOH", "STX", "ETX", _
		"EOT", "ENQ", "ACK", "BEL", _
		"BS ", "HT ", "LF ", "VT ", _
		"FF ", "CR ", "SO ", "SI ", _
		"DLE", "DC1", "DC2", "DC3", _
		"DC4", "NAK", "SYN", "ETB", _
		"CAN", "EM" , "SUB", "ESC", _
		"FS ", "GS ", "RS ", "US "  _
	}

sub terminal_write_string( byval clr as integer, byref s as const string )
	static last_ch as integer = 0
	color clr
	for i as integer = 1 to len(s)
		dim ch as integer = asc(mid(s,i,1))
		select case ch
		case 0 to 31
			if( last_ch = 13 and ch <> 10 ) then
				print
			end if
			print "<" & rtrim(code(ch)) & ">";
			if( ch = 10 ) then
				print
			end if
		case else
			if( last_ch = 13 ) then
				print
			end if
			print chr(ch);
		end select
		last_ch = ch
	next
	color 7
end sub

function keyboard_read_key() as string
	function = inkey
end function

function keyboard_read_string( byref buffer as string, byref k as string = "" ) as boolean

	'' no key? then get one
	if( k = "" ) then
		k = keyboard_read_key()
	end if

	select case k
	case KEYBOARD_BACKSPACE
		buffer = left( buffer, len(buffer) - 1 )
		terminal_write_string( COLOR_KEYBOARD, k )

	case KEYBOARD_EOL
		terminal_write_string( COLOR_KEYBOARD, KEYBOARD_EOL )
		return true

	case else
		if( len(buffer) < MAX_BUFFER ) then
			buffer += k
			terminal_write_string( COLOR_KEYBOARD, k )
		end if

	end select

	return false

end function

function arduino_open() as boolean
	dim s as string
	s = DEVICE_COM & ":9600,n,8,1,cs0,ds0,cd0,rs"
	function = not cbool( open com(s As #DEVICE_FILE_NO ) )
end function

sub arduino_close()
	close #DEVICE_FILE_NO
end sub

function arduino_read_byte() as string
	if loc(DEVICE_FILE_NO) > 0 THEN
		function = input( 1, #DEVICE_FILE_NO )
	end if
end function

function arduino_read_string( byref buffer as string ) as boolean
	dim r as string

	'' read any response from arduino
	do
		r = arduino_read_byte()
		select case r

		'' end of response/string?
		case DEVICE_EOL
			return true

		'' otherwise add to the buffer
		case else
			if( len( buffer ) < MAX_BUFFER ) then
				buffer &= r
			end if
		end select
	loop until r = ""

	return false
end function

sub arduino_write_string( byref s as string )
	print #DEVICE_FILE_NO, s;
end sub


'' ----------------
'' MAIN
'' ----------------

if arduino_open() = false then
	print "error connecting to arduino"
	end 1
end if

const COLOR_KEYBOARD = 7
const COLOR_TERMINAL = 12
const COLOR_INPUT    = 13
const COLOR_OUTPUT   = 10

terminal_write_string( COLOR_KEYBOARD, "keyboard" & KEYBOARD_EOL )
terminal_write_string( COLOR_TERMINAL, "terminal" & TERMINAL_EOL )
terminal_write_string( COLOR_OUTPUT, "output" & DEVICE_EOL )
terminal_write_string( COLOR_INPUT, "input" & DEVICE_EOL )

terminal_write_string( COLOR_TERMINAL, "connected" & TERMINAL_EOL )

dim as string k, cmd_buffer
dim as string r, dev_buffer

do
	k = keyboard_read_key()

	if( k = KEYBOARD_ESCAPE ) then
		exit do
	end if

	'' read keyboard in to cmd_buffer, and then write it
	'' to the device when we have a full command
	if( keyboard_read_string( cmd_buffer, k ) ) then
		terminal_write_string( COLOR_OUTPUT, cmd_buffer & DEVICE_EOL )
		arduino_write_string( cmd_buffer & DEVICE_EOL )

		'' done with command buffer, so clear it
		cmd_buffer = ""
	end if

	'' read from the device and print the results only when
	'' we have the full response
	if( arduino_read_string( dev_buffer) ) then
		terminal_write_string( COLOR_INPUT, dev_buffer & DEVICE_EOL )

		'' done with the response buffer, so clear it
		dev_buffer = ""
	end if

	sleep 20

loop

arduino_close()

terminal_write_string( COLOR_TERMINAL, "disconnected" & TERMINAL_EOL )
Also, the sketch from demo 1 & 2 can be used with either fbc program in demo 1 & 2. It's actually interesting to see what's going on if there is buffering at one end but not the other.
FYI, I added a conditional for /dev/ttyACM0 to be selected as COM port on linux. Otherwise it's "COM7" for win, which works for me.
Code: Select all
#ifdef __FB_LINUX__
const DEVICE_COM = "/dev/ttyACM0"
#else
const DEVICE_COM = "COM7"
#endif

#if defined(__FB_DOS__) or defined(__FB_WIN32__)
	const TERMINAL_EOL = chr(13, 10)
#else
	const TERMINAL_EOL = chr(10)
#endif
Arduino Serial Communication Demo #3
Arduino Serial Communication Demo #3
In demo #2, we added message buffers. While not impossible to follow the code, after the use of a few global variables, the code starts to get a little cluttered.
In this demo #3, we take the code from demo #2 and wrap the message buffer in a c++ class for the Arduino sketch. It helps clean up the main code, and also makes the code re-usable, for example if we also wanted an output buffer (not sure we do at the moment).
Overall, creating the class causes the program code in demo #3 to be 42 bytes larger than the program code in demo #2 on the Arduino, basically, due the fact that I made the buffer() and length() variables in to member procedures, so there is a little more overhead.
The MessageBuffer class is in it's own file "MessageBuffer.h"
And the main sketch for demo #3 now looks like:
For demo #4 the rest of demo #3, we will be giving the same treatment to the fbc host program. Actually, the MessageBuffer class in fbc is going to look a lot like MessageBuffer class for Arduino, so using it in either place should feel familiar.
In demo #2, we added message buffers. While not impossible to follow the code, after the use of a few global variables, the code starts to get a little cluttered.
In this demo #3, we take the code from demo #2 and wrap the message buffer in a c++ class for the Arduino sketch. It helps clean up the main code, and also makes the code re-usable, for example if we also wanted an output buffer (not sure we do at the moment).
Overall, creating the class causes the program code in demo #3 to be 42 bytes larger than the program code in demo #2 on the Arduino, basically, due the fact that I made the buffer() and length() variables in to member procedures, so there is a little more overhead.
The MessageBuffer class is in it's own file "MessageBuffer.h"
Code: Select all
#define END_OF_MESSAGE_CHAR 10
#define MAX_MESSAGE_LENGTH 40

class MessageBuffer
{
  private:
    uint8_t msg_buffer[MAX_MESSAGE_LENGTH+1] = { '\0' };
    uint8_t msg_length = 0;
    uint16_t last_char = -1;

  public:
    void clear()
    {
      msg_buffer[0] = '\0';
      msg_length = 0;
      last_char = -1;
    }

    /*
     * addChar( char )
     *
     * add characters to the message buffer.
     * return true if we get the end of message character
     * otherwise return false.  The end of message
     * character is not part of the message.
     */
    boolean addChar( int16_t ch )
    {
      // invalid char? do nothing
      if( ch < 0 || ch > 255 )
        return false;

      last_char = ch;

      // end of message char? we have a complete message
      if( ch == END_OF_MESSAGE_CHAR )
        return true;

      // have space in the buffer? add the char
      if( msg_length < MAX_MESSAGE_LENGTH )
      {
        msg_buffer[msg_length] = (uint8_t)ch;
        msg_length += 1;
        msg_buffer[msg_length] = '\0';
      }
      return false;
    }

    boolean isComplete() {
      return (last_char == END_OF_MESSAGE_CHAR);
    }

    uint8_t* text()
    {
      return msg_buffer;
    }

    uint8_t length()
    {
      return msg_length;
    }
};
Code: Select all
#include "MessageBuffer.h"

static MessageBuffer msg;

void setup()
{
  Serial.begin( 9600 );
  while( !Serial )
    delay(1);

  Serial.print( "Arduino is online - demo 3\n" );
}

void loop()
{
  while( Serial.available() > 0 )
  {
    int16_t ch = Serial.read();
    if( msg.addChar( ch ) )
      break;
  }

  if( msg.isComplete() )
  {
    if( strcmp( "hello", msg.text() ) == 0 )
    {
      Serial.print( "HELLO back at you!\n" );
    }
    else
    {
      // otherwise echo the command back to host
      Serial.write( msg.text(), msg.length() );
      Serial.print( "\n" );
    }

    // we are done with the command message now, so clear it.
    msg.clear();
  }
}
Re: FreeBasic communication with Arduino logic error?
Hey, I know it's probably looking like I'm taking a really long walk to get to the point. Just to let you know, this has been pretty fun for me, and at the end, I hope you'll get what you want. And for me, I hope I'll have I nice little series of tutorials to look back on. Though I probably have to go back and expand some details, and edit all my mistakes. :)BasicCoder2 wrote:The idea is for the PC to send the Arduino commands and the Arduino to act on them.
Arduino Serial Communication Demo #3 (continued)
Arduino Serial Communication Demo #3 (continued)
Here is the rest of demo #3, where we rewrite the code to use classes.
I tried using the "Header.inc" paradigm that seems popular with the PB programmers. Not my usual way, but thought I would give it a chance.
So the main fbc host program is as follows (the include headers follow below):
MessageBuffer.inc
Very similar to the MessageBuffer class used in the Arduino sketch.
SerialPort.inc
A class that works a little bit like Serial object in arduino sketches. Because fb can open open multiple ports, I opted for Serial.Open(com, baud) and serial.Close() instead. Only a few methods are implemented, sorry.
SerialPort.inc, partial example
TerminalDisplay.inc
Wraps some of the terminal display stuff in a class. Honestly I was starting to lose some ambition for this demo when writing this class. It works well enough to give same results as demo #2.
I was enthusiastic about this demo #3 for a while, but when I started writing "TerminalDisplay" in to a class, I realized that this is kind of headed in the wrong direction. Like it's interesting, because it's showing how to write the same code using a different method, but with respect to serial communication, it's not really showing anything new over demo #2. But I have a good idea for demo #4, basically restart with a new approach.
Here is the rest of demo #3, where we rewrite the code to use classes.
I tried using the "Header.inc" paradigm that seems popular with the PB programmers. Not my usual way, but thought I would give it a chance.
So the main fbc host program is as follows (the include headers follow below):
Code: Select all
#include "SerialPort.inc"
#include "TerminalDisplay.inc"
#include "MessageBuffer.inc"

#ifdef __FB_LINUX__
	const DEVICE_COM = "/dev/ttyACM0"
#else
	const DEVICE_COM = "COM7"
#endif

const KEYBOARD_ESCAPE = 27
const KEYBOARD_ENTER = 13
const KEYBOARD_BACKSPACE = 8

#if defined(__FB_DOS__) or defined(__FB_WIN32__)
	const TERMINAL_EOL = chr(13, 10)
#else
	const TERMINAL_EOL = chr(10)
#endif

const KEYBOARD_EOL = chr(13)
const DEVICE_EOL = chr(10)

'' ----------------
'' MAIN
'' ----------------

dim shared serial as SerialPort
dim shared terminal as TerminalDisplay
dim shared cmd as MessageBuffer
dim shared response as MessageBuffer

'' setup()
with terminal
	.color( COLOR_KEYBOARD )
	.print( "keyboard" & KEYBOARD_EOL )
	.color( COLOR_TERMINAL )
	.print( "terminal" & TERMINAL_EOL )
	.color( COLOR_OUTPUT )
	.print( "output" & DEVICE_EOL )
	.color( COLOR_INPUT )
	.print( "input" & DEVICE_EOL )
	.color( COLOR_TERMINAL )
end with

serial.open( DEVICE_COM, 9600 )

if( serial ) then
	terminal.print( "connected" & TERMINAL_EOL )
else
	terminal.print( "error connecting to arduino" )
	end 1
end if

'' loop()
do
	'' read keyboard until we have complete command
	'' or escape, or no more keys to read

	dim k as string = inkey
	for i as integer = 1 to len(k)
		dim as integer ch = asc( k, i )

		'' escape? immediately exit
		if( ch = KEYBOARD_ESCAPE ) then
			exit do
		end if

		terminal.color( COLOR_KEYBOARD )
		terminal.write( ch )

		'' CR=>LF translation
		if( ch = KEYBOARD_ENTER ) then
			ch = END_OF_MESSAGE_CHAR
		end if

		if( ch = KEYBOARD_BACKSPACE ) then
			cmd.backChar()

		'' add char to command, and exit if we have full command
		elseif( cmd.addChar( ch ) ) then
			exit for
		end if
	next

	'' have a complete command? then send it
	if( cmd.isComplete() ) then
		terminal.color( COLOR_OUTPUT )
		terminal.write( cmd.buffer(), cmd.length() )
		terminal.write( DEVICE_EOL )

		serial.write( cmd.buffer(), cmd.length() )
		serial.write( DEVICE_EOL )

		'' done with the command, so clear it
		cmd.clear()
	end if

	'' read everything from the serial port until we have
	'' have a full response, or no more to read
	while( serial.available() > 0 )
		dim as integer ch = serial.read()
		if( response.addChar( ch ) ) then
			exit while
		end if
	wend

	'' have a complete response? then show it
	if( response.isComplete() ) then
		terminal.color( COLOR_INPUT )
		terminal.write( response.buffer(), response.length() )
		terminal.write( DEVICE_EOL )

		'' done with the response to clear it
		response.clear()
	end if

loop

'' exit()
serial.close()

with terminal
	.color( COLOR_TERMINAL )
	.print( "disconnected" & TERMINAL_EOL )
	.color( COLOR_TERMINAL )
end with
Very similar to the MessageBuffer class used in the Arduino sketch.
Code: Select all
#define END_OF_MESSAGE_CHAR 10
#define MAX_MESSAGE_LENGTH 40

type MessageBuffer
	private:
		as ubyte msg_buffer(0 to MAX_MESSAGE_LENGTH) = { 0 }
		as ubyte msg_length = 0
		as short last_char = -1
	public:
		declare sub clear()
		declare function addChar( byval ch as short ) as boolean
		declare function backChar() as boolean
		declare function isComplete() as boolean
		declare function buffer() as ubyte ptr
		declare function length() as ubyte
		declare function text() as string
end type

private sub MessageBuffer.clear()
      msg_buffer(0) = 0
      msg_length = 0
      last_char = -1
end sub

private function MessageBuffer.addChar( byval ch as short ) as boolean

	'' invalid char? do nothing
	if( ch < 0 or ch > 255 ) then
		return false
	end if

	last_char = ch

	'' end of message char? we have a complete message
	if( ch = END_OF_MESSAGE_CHAR ) then
		return true
	end if

	'' have space in the buffer? add the char
	if( msg_length < MAX_MESSAGE_LENGTH ) then
		msg_buffer(msg_length) = ch
		msg_length += 1
		msg_buffer(msg_length) = 0
	end if

	return false

end function

private function MessageBuffer.backChar() as boolean
	if( msg_length > 0 ) then
		msg_length -= 1
		msg_buffer(msg_length) = 0
		last_char = -1
		return true
	end if
	return false
end function

private function MessageBuffer.isComplete() as boolean
	return (last_char = END_OF_MESSAGE_CHAR)
end function

private function MessageBuffer.buffer() as ubyte ptr
	return @msg_buffer(0)
end function

private function MessageBuffer.length() as ubyte
	return msg_length
end function

private function MessageBuffer.text() as string
	return *cast( zstring ptr, buffer() )
end function
A class that works a little bit like Serial object in arduino sketches. Because fb can open open multiple ports, I opted for Serial.Open(com, baud) and serial.Close() instead. Only a few methods are implemented, sorry.
Code: Select all
#define DEFAULT_BAUD_RATE 9600

type SerialPort
	private:
		file_no as long

	public:
		declare constructor()
		declare destructor()
		declare function getFbFileNo() as long
		declare operator cast() as boolean
		declare sub open( byref port as const string, byval baud as const uinteger = DEFAULT_BAUD_RATE )
		declare sub close()
		declare function available() as longint
		declare function read() as integer
		declare function write( byval value as const integer ) as integer
		declare function write( byref s as const string ) as integer
		declare function write( byval buffer as const ubyte const ptr, byval length as const uinteger ) as integer
		declare function print( byref s as const string ) as integer
end type

private constructor SerialPort()
	file_no = 0
end constructor

private destructor SerialPort()
	this.close()
end destructor

private function SerialPort.getFbFileNo() as long
	return file_no
end function

private operator SerialPort.cast() as boolean
	return cbool( file_no <> 0 )
end operator

private sub SerialPort.open( byref port as const string, byval baud as const uinteger = DEFAULT_BAUD_RATE )
	dim h as long = freefile
	if( ..open com( port & ":" & baud & ",n,8,1,cs0,ds0,cd0,rs" as #h ) = 0 ) then
		if( file_no ) then
			..close #file_no
		end if
		file_no = h
	end if
end sub

private sub SerialPort.close()
	if( file_no > 0 ) then
		..close #file_no
		file_no = 0
	end if
end sub

private function SerialPort.available() as longint
	if( file_no > 0 ) then
		return loc( file_no )
	else
		return 0
	end if
end function

private function SerialPort.read() as integer
	if( file_no > 0 ) then
		if( loc( file_no ) > 0 ) then
			return asc( input( 1, #file_no ) )
		end if
	end if
	return -1
end function

private function SerialPort.write( byval value as const integer ) as integer
	if( file_no > 0 ) then
		if( put( #file_no, , cubyte(value) ) = 0 ) then
			return 1
		end if
	end if
	return 0
end function

private function SerialPort.write( byref s as const string ) as integer
	if( file_no > 0 ) then
		if( put( #file_no, , s ) = 0 ) then
			return len(s)
		end if
	end if
	return 0
end function

private function SerialPort.write( byval buffer as const ubyte const ptr, byval length as const uinteger ) as integer
	if( file_no > 0 ) then
		if( put( #file_no, , *buffer, length ) = 0 ) then
			return length
		end if
	end if
	return 0
end function

private function SerialPort.print( byref s as const string ) as integer
	return write( s )
end function
Code: Select all
#include "SerialPort.inc"
dim serial as SerialPort
serial.open( "/dev/ttyACM0", 9600 )
if( serial ) then
	print "connected"
else
	print "error": end
end if
if( serial.available() > 0 ) then
	dim ch as ubyte = serial.read()
	serial.write( ch )
end if
'' etc, etc, etc
serial.close()
Wraps some of the terminal display stuff in a class. Honestly I was starting to lose some ambition for this demo when writing this class. It works well enough to give same results as demo #2.
Code: Select all
const COLOR_KEYBOARD = 7
const COLOR_TERMINAL = 12
const COLOR_INPUT    = 13
const COLOR_OUTPUT   = 10

type TerminalDisplay
	private:
		last_ch as integer = 0

	public:
		declare operator cast() as boolean
		declare sub color( byval clr as integer )
		declare function write( byval value as const integer ) as integer
		declare function write( byref s as const string ) as integer
		declare function write( byval buffer as const ubyte const ptr, byval length as const uinteger ) as integer
		declare function print( byref s as const string ) as integer
end type

private sub TerminalDisplay.color( byval clr as integer )
	..color clr
end sub

private function TerminalDisplay.write( byval value as const integer ) as integer
	dim s as string = chr(value)
	return write( strptr(s), len(s) )
end function

private function TerminalDisplay.write( byref s as const string ) as integer
	return write( strptr(s), len(s) )
end function

private function TerminalDisplay.write( byval buffer as const ubyte const ptr, byval length as const uinteger ) as integer

	static code(0 to 31) as zstring * 4 = _
		 { _
			"NUL", "SOH", "STX", "ETX", _
			"EOT", "ENQ", "ACK", "BEL", _
			"BS ", "HT ", "LF ", "VT ", _
			"FF ", "CR ", "SO ", "SI ", _
			"DLE", "DC1", "DC2", "DC3", _
			"DC4", "NAK", "SYN", "ETB", _
			"CAN", "EM" , "SUB", "ESC", _
			"FS ", "GS ", "RS ", "US "  _
		}

	dim count as integer = 0

	for i as integer = 0 to length-1
		dim ch as integer = buffer[i]
		select case ch
		case 0 to 31
			if( last_ch = 13 and ch <> 10 ) then
				..print
			end if
			..print "<" & rtrim(code(ch)) & ">";
			if( ch = 10 ) then
				..print
			end if
		case else
			if( last_ch = 13 ) then
				..print
			end if
			..print chr(ch);
			count += 1
		end select
		last_ch = ch
	next
	return count
end function

private function TerminalDisplay.print( byref s as const string ) as integer
	return write( strptr(s), len(s) )
end function
Re: FreeBasic communication with Arduino logic error?
Thanks for doing all of this, it's extremely helpful. I'm a total beginner at communicating with another device this way, so please bear with me... I have a few questions... and then I'll probably have more. lol
So, I can only get coms to work, if I use COM3. Is there an explanation for this? At first, I thought it was actually referring to the specific USB port my Arduino is hooked up to as COM3. However, it doesn't matter which USB port I connect to. Why is that?
So, I can only get coms to work, if I use COM3. Is there an explanation for this? At first, I thought it was actually referring to the specific USB port my Arduino is hooked up to as COM3. However, it doesn't matter which USB port I connect to. Why is that?